0%

keep-alive 组件是官方自带的用于缓存第一个子组件的组件。组件在 created 钩子内创建两个变量 cache keys 用于存储缓存的子组件和子组件对应缓存列表内的 key,由于 render 函数是在 beforeMount 和 mounted 钩子之间执行,且所有子组件的生命周期会在父组件的 mounted 钩子之前完成,所有在 render 函数内获取第一个子组件是否存在在缓存列表中,如果存在则用缓存到的组件实例 componentInstance 去替换新生成的 子组件 vnode 的实例,否则创建变量 vnodeToCache keyToCache,存储 vode 和 vnode 对应的 key,在 mounted 钩子内执行缓存方法将子组件放入缓存列表内,并监听 include exclude 去判断是否要缓存

1
2
3
4
5
6
7
8
9
10
11
12
13
14
15
16
17
18
19
20
21
22
23
24
25
26
27
28
29
30
31
32
33
34
35
36
37
38
39
40
41
42
43
44
45
46
47
48
49
50
51
52
53
54
55
56
57
58
59
60
61
62
63
64
65
66
67
68
69
70
71
72
73
74
75
76
77
78
79
80
81
82
83
84
85
86
87
88
89
90
91
92
93
94
95
96
97
98
99
100
101
102
103
104
105
106
107
108
109
110
111
112
113
114
115
116
117
118
119
120
121
122
123
124
125
126
127
128
129
130
131
132
133
134
135
136
137
138
139
140
141
142
143
144
145
146
147
148
149
150
151
152
153
154
155
156
157
158
159
160
161
162
163
164
165
166
167
168
169
170
171
172
173
174
175
176
177
178
179
180
181
182
183
184
185
186
187
188
// 判断值是否定义
function isDef(v) {
return v !== undefined && v !== null
}

function isAsyncPlaceholder(node) {
return node.isComment && node.asyncFactory
}

// 返回所有子元素中第一个子组件
function getFirstComponentChild(children) {
if (Array.isArray(children)) {
for (let i = 0; i < children.length; i++) {
const c = children[i]
if (isDef(c) && (isDef(c.componentOptions) || isAsyncPlaceholder(c))) {
return c
}
}
}
}

// 删除数组元素
function remove(arr, item) {
if (arr.length) {
const index = arr.indexOf(item)
if (index > -1) {
return arr.splice(index, 1)
}
}
}

// 获取组件名
function getComponentName(opts) {
return opts && (opts.Ctor.options.name || opts.tag)
}

// 判断值是否存在 [String, Array]
function matches(pattern, name) {
if (Array.isArray(pattern)) {
return pattern.indexOf(name) > -1
} else if (typeof pattern === 'string') {
return pattern.split(',').indexOf(name) > -1
}

return false
}


function pruneCache(keepAliveInstance, filter) {
const { cache, keys, _vnode } = keepAliveInstance
for (const key in cache) {
const entry = cache[key]
console.log('entry', entry)
if (entry) {
const name = entry.name
if (name && !filter(name)) {
pruneCacheEntry(cache, key, keys, _vnode)
}
}
}
}

function pruneCacheEntry(cache, key, keys, current) {
const entry = cache[key]
if (entry && (!current || entry.tag !== current.tag)) {
entry.componentInstance.$destroy()
}
cache[key] = null
remove(keys, key)
}

const patternTypes = [String, RegExp, Array]

export default {
name: 'keep-alive',
props: {
include: patternTypes,
exclude: patternTypes,
max: [String, Number],
},
data() {
return {
// cache: Object.create(null),
// keys: [],
}
},
methods: {
cacheVNode() {
const { cache, keys, vnodeToCache, keyToCache } = this

if (vnodeToCache) {
const { tag, componentInstance, componentOptions } = vnodeToCache
cache[keyToCache] = {
name: getComponentName(componentOptions),
tag,
componentInstance,
}
keys.push(keyToCache)
// 判断 prop max 超出则删除缓存列表中的第一个
if (this.max && keys.length > parseInt(this.max)) {
pruneCacheEntry(cache, keys[0], keys, this._vnode)
}
this.vnodeToCache = null
}
},
},
beforeCreate() {
console.log('keep-alive vue beforeCreate')
},
created() {
console.log('keep-alive vue created')
this.cache = Object.create(null)
console.log('cache', this.cache)
this.keys = []
},
beforeMount() {
console.log('keep-alive vue beforeMount')
},
mounted() {
// render 后缓存子节点
this.cacheVNode()
this.$watch('include', (val) => {
pruneCache(this, (name) => matches(val, name))
})
this.$watch('exclude', (val) => {
pruneCache(this, (name) => !matches(val, name))
})
console.log('keep-alive vue mounted')
console.log('keep-alive this', this)
console.log('keep-alive $vnode', this.$vnode)
console.log('keep-alive _vnode', this._vnode)
console.log('this.cache', this.cache)
console.log('this.keys', this.keys)
},
beforeUpdate() {
console.log('keep-alive vue beforeUpdate')
},
updated() {
console.log('keep-alive vue updated')
},
destroyed() {
for (const key in this.cache) {
pruneCacheEntry(this.cache, key, this.keys)
}
},
render() {
console.log('keep-alive vue render')
const slot = this.$slots.default
const vnode = getFirstComponentChild(slot)
const componentOptions = vnode && vnode.componentOptions
console.log('componentOptions', componentOptions)
if (componentOptions) {
const name = getComponentName(componentOptions)
const { include, exclude, cache, keys } = this

if (
// not included
(include && (!name || !matches(include, name))) ||
// excluded
(exclude && name && matches(exclude, name))
) {
return vnode
}

const key =
vnode.key == null
? componentOptions.Ctor.cid +
(componentOptions.tag ? `::${componentOptions.tag}` : '')
: vnode.key
if (cache[key]) {
// 如果缓存中存在该子节点则用缓存的实例替换生成的实例
vnode.componentInstance = cache[key].componentInstance
// keys 数组去重
remove(keys, key)
keys.push(key)
} else {
// 否则将子节点赋值给 vnodeToCache, render 执行完毕后再 mounted 钩子内进行子节点缓存
this.vnodeToCache = vnode
this.keyToCache = key
}

// 在子节点 data 上添加 keepAlive 属性用于跳过其他生命周期钩子
vnode.data.keepAlive = true
}

return vnode || (slot && slot[0])
},
}

在此不赘述何为自定义指令,请自行查看官方文档:

自定义指令 — Vue.js

团队项目开发基于 element ui,但是在实际开发过程中发现 element 的 loading 样式并不能满足实际开发中的需求,遂决定利用 vue 的自定义指令添加一个全局的 loading 指令。

loading 指令的核心是在 bind 和 componentUpdated 钩子中,当 binding.value 为 true 时给元素添加一个加载遮罩,false 时移除遮罩。需要注意的是,在项目开发中加载状态分为加载中和加载完成,各自对应不同的样式。

1
2
3
4
5
6
7
8
9
10
11
12
13
14
15
16
17
18
19
20
21
22
23
24
25
26
27
28
29
30
31
32
33
34
35
36
37
38
39
40
Vue.directive('loading', {
bind(el, binding) {
if(binding.value) {
// 限制全局只有一个弹窗
let myLoading = document.getElementById('my-loading')
if(myLoading) {
myLoading.parentNode.removeChild(myLoading)
}
let div = document.createElement('div')
div.setAttribute('id', 'my-loading')
// 自定义弹窗样式
div.innerHTML = `<div>加载中</div>`
document.body.appendChild(div)
}
},
componentUpdated(el, binding) {
if(binding.oldValue !== binding.value) {
// 在组件更新时对绑定值进行判定
if(binding.value) {
let myLoading = document.getElementById('my-loading')
if(myLoading) {
myLoading.parentNode.removeChild(myLoading)
}
let div = document.createElement('div')
div.setAttribute('id', 'my-loading')
// 自定义加载中样式
div.innerHTML = `<div>加载中</div>`
document.body.appendChild(div)
} else {
let myLoading = document.getElementById('my-loading')
// 自定义加载完成样式
div.innerHTML = `<div>加载完成</div>`
// 加载完成动画完成之后从 DOM 中移除元素
setTimeout(() => {
myLoading.parentNode.removeChild(myLoading)
}, 1000)
}
}
}
})

Vue.nextTick

在下次 DOM 更新循环结束之后执行延迟回调。在修改数据之后立即使用这个方法,获取更新后的 DOM

获取更新后的DOM言外之意就是什么操作需要用到了更新后的DOM而不能使用之前的DOM或者使用更新前的DOM会出问题,所以就衍生出了这个获取更新后的 DOMVue方法。所以放在Vue.nextTick()回调函数中的执行的应该是会对DOM进行操作的 js代码


使用场景
  • vue 生命周期的 created() 钩子进行 DOM 操作一定要放在 Vue.nextTick() 的回调函数中 ,原因是在 created() 钩子函数执行的时候DOM 其实并未进行任何渲染,而此时进行DOM操作无异于徒劳,所以此处一定要将DOM操作的js代码放进Vue.nextTick()的回调函数中。

  • 在数据变化后要执行的某个操作,当你设置 vm.someData = 'new value'DOM并不会马上更新,而是在异步队列被清除,也就是下一个事件循环开始时执行更新时才会进行必要的DOM更新。如果此时你想要根据更新的 DOM 状态去做某些事情,就会出现问题。为了在数据变化之后等待 Vue 完成更新 DOM ,可以在数据变化之后立即使用 Vue.nextTick(callback) 。这样回调函数在 DOM 更新完成后就会调用。

  • mounted 不会承诺所有的子组件也都一起被挂载。如果你希望等到整个视图都渲染完毕,可以用 vm.$nextTick 替换掉 mounted

    1
    2
    3
    4
    5
    6
    7
    mounted () {
    this.$nextTick(function () {

    // Code that will run only after the
    // entire view has been rendered
    })
    }
  • 由于 Vue.nextTick() 是异步执行的, 所以可以使用 async / await 将代码写成同步的形式。

1. 将 HTML 表单转化为 FormData 对象

1
2
var form = document.getElementById('form'); 
var formData = new FormData(form);

2. 提交表单对象

1
xhr.send(formData);

注意:

1.Formdata 对象不能用于 get 请求,因为对象需要被传递到 send 方法中,而 get 请求方式的请求参数只能放在请求地址的后面。

2.服务器端 bodyParser 模块不能解析 formData 对象表单数据,我们需要使用 formidable 模块进行解析。

3. 服务器端 formidable 模块解析

1
2
3
4
5
6
// 创建formidable表单解析对象
const form = new formidable.IncomingForm();
// 解析客户端传递过来的FormData对象
form.parse(req, (err, fields, files) => {
res.send(fields);
});

4. FormData 对象的实例方法

1. 获取表单对象中属性的值

1
formData.get('key');

2. 设置表单对象中属性的值

1
2
// 如果设置的表单属性不存在,将会创建这个表单属性;否则覆盖原有值
formData.set('key', 'value');

3. 删除表单对象中属性的值

1
formData.delete('key');

4. 向表单对象中追加属性值

1
2
// set 方法与 append 方法的区别是,在属性名已存在的情况下,set 会覆盖已有键名的值,append会保留两值。 
formData.append('key', 'value');

5. FormData 二进制文件上传

1
2
3
4
5
6
7
8
9
10
11
var file = document.getElementById('file')
// 当用户选择文件的时候
file.onchange = function () {
// 创建空表单对象
var formData = new FormData();
// 将用户选择的二进制文件追加到表单对象中
formData.append('attrName', this.files[0]);
// 配置ajax对象,请求方式必须为post
xhr.open('post', 'www.example.com');
xhr.send(formData);
}

实现文件上传的路由

1
2
3
4
5
6
7
8
9
10
11
12
13
14
15
16
// 实现文件上传的路由
app.post('/upload', (req, res) => {
// 创建formidable表单解析对象
const form = new formidable.IncomingForm();
// 设置客户端上传文件的存储路径
form.uploadDir = path.join(__dirname, 'public', 'uploads');
// 保留上传文件的后缀名字
form.keepExtensions = true;
// 解析客户端传递过来的FormData对象
form.parse(req, (err, fields, files) => {
// 将客户端传递过来的文件地址响应到客户端
res.send({
path: files.attrName.path.split('public')[1]
});
});
});

FormData 文件上传进度展示

1
2
3
4
5
6
7
8
9
// 当用户选择文件的时候
file.onchange = function () {
// 文件上传过程中持续触发onprogress事件
xhr.upload.onprogress = function (ev) {
// 当前上传文件大小/文件总大小 再将结果转换为百分数
// 将结果赋值给进度条的宽度属性
bar.style.width = (ev.loaded / ev.total) * 100 + '%';
}
}

FormData 文件上传图片即时预览

1
2
3
4
5
6
7
8
xhr.onload = function () {
var result = JSON.parse(xhr.responseText);
var img = document.createElement('img');
img.src = result.src;
img.onload = function () {
document.body.appendChild(this);
}
}

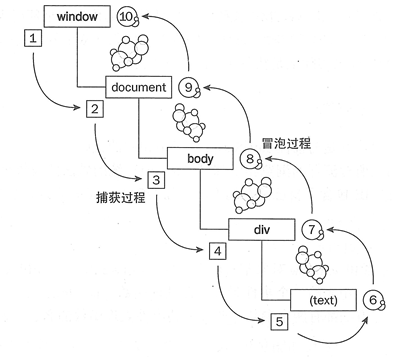
1.事件捕获

1
2
3
4
5
6
7
8
9
10
11
12
13
var id1 = document.querySelector('#id1')
var id2 = document.querySelector('#id2')
var id3 = document.querySelector('#id3')
// 事件捕获是 addEventListener 的第三个参数 useCapture
id1.addEventListener('click', function(event){
console.log('capture click id1', event)
}, true)
id2.addEventListener('click', function(event){
console.log('capture click id2', event)
}, true)
id3.addEventListener('click', function(event){
console.log('capture click id3', event)
}, true)

捕获型事件(event capturing):事件从最不精确的对象(document 对象)开始触发,然后到最精确(也可以在窗口级别捕获事件,不过必须由开发人员特别指定)。

2.事件冒泡

1
2
3
4
5
6
7
8
9
10
11
12
13
14
15
var id1 = document.querySelector('#id1')
var id2 = document.querySelector('#id2')
var id3 = document.querySelector('#id3')
// 事件冒泡
id1.addEventListener('click', function(event){
console.log('click id1', event)
})
id2.addEventListener('click', function(event){
console.log('click id2', event)
})
id3.addEventListener('click', function(event){
console.log('click id3', event)
// 吃掉冒泡事件
event.cancelBubble = true
})

冒泡型事件:事件按照从最特定的事件目标到最不特定的事件目标(document对象)的顺序触发。

3.捕获和冒泡过程图

1
2
3
4
5
6
7
8
9
10
11
12
13
14
15
16
17
18
19
20
21
22
23
24
25
26
27
28
29
30
31
32
33
34
35
36
37
38
39
40
41
42
43
44
45
46
47
48
49
50
51
52
53
54
55
56
57
58
// 获取登录页面
// 创建 AJAX 对象
var r = new XMLHttpRequest()
// 设置请求方法和请求地址
r.open('GET', '/login', true)
// 注册响应函数
r.onreadystatechange = function() {
if(r.readyState == 4) {
console.log('请求成功', r)
}
}
// 发送请求
r.send()


// 发送登录数据
// 创建 AJAX 对象
var r = new XMLHttpRequest()
// 设置请求方法和请求地址
r.open('POST', '/login', true)
// 设置发送的数据的格式
r.setRequestHeader('Content-Type', 'application/json')
// 注册响应函数
r.onreadystatechange = function() {
if (r.readyState === 4) {
console.log('state change', r, r.status, r.response)
var response = JSON.parse(r.response)
console.log('response', response)
} else {
console.log('change')
}
}
// 发送请求
var account = {
username: 'iihll',
password: '123',
}
var data = JSON.stringify(account)
r.send(data)


// 封装成一个函数
var ajax = function(method, path, headers, data, responseCallback) {
var r = new XMLHttpRequest()
// 设置请求方法和请求地址
r.open(method, path, true)
// 设置发送的数据的格式
r.setRequestHeader('Content-Type', 'application/json')
// 注册响应函数
r.onreadystatechange = function() {
if(r.readyState === 4) {
responseCallback(r)
}
}
// 发送请求
r.send(data)
}

1
2
3
4
5
6
7
8
9
10
11
12
13
14
15
16
17
18
19
20
21
22
23
24
25
26
27
28
29
/*
localStorage 是浏览器自带的功能
localStorage 可以用来存储字符串数据, 在浏览器关闭后依然存在
但是不同页面拥有各自独立的 localStorage */
// 存储方法如下
localStorage.name = 'xx'
/*
关闭浏览器, 再次打开, 仍然能获取到这个值
log('关闭浏览器后', localStorage.name)

利用 localStorage 就可以存储数据
但是数据存在 array 中
而 localStorage 只能存储 string 数据
所以没办法直接存储

可行的办法如下
存储的时候把 array 转换为字符串
读取的时候把字符串转成 array
这个过程通常被称之为 序列化 和 反序列化

在 js 中, 序列化使用 JSON 数据格式
全称 JavaScript Object Notation (js对象标记) */

var s = JSON.stringify([1, 2, 3, 4])
console.log('序列化后的字符串', typeof s, s)
var a = JSON.parse(s)
console.log('反序列化后的数组', typeof a, a)

// 使用 JSON 序列化后, 就可以把数据存入浏览器的 localStorage 了

1
2
3
4
5
6
7
8
9
10
11
12
13
14
15
element.insertAdjacentHTML(position, text)
/*
position 是相对于元素的位置,并且必须是以下字符串之一:

'beforebegin' —— 元素自身的前面。

'afterbegin' —— 插入元素内部的第一个子节点之前。

'beforeend' —— 插入元素内部的最后一个子节点之后。

'afterend' —— 元素自身的后面。

text 是要被解析为 HTML 或 XML,并插入到 DOM 树中的字符串。 */

element.innerHTML() // 就是往元素内部插入(覆盖)一段 html 代码。